[ad_1]
At this point, everyone has already heard that Microsoft is buying GitHub. Acquisitions of this scale take time, but most expect everything to be official by 2019. The general opinion online seems to be one of unease, and rightfully so. Even if we ignore Microsoft’s history of shady practices, there’s always an element of unease when somebody new takes over something you love. Sometimes it ends up being beneficial, the beginning of a new and better era. But sometimes…
![]() Let’s not dwell on what might become of GitHub. While GitHub is the most popular web-based interface for Git, it’s not the only one. For example GitLab, a fully open source competitor to GitHub, is reporting record numbers of new repositories being created after word of the Microsoft buyout was confirmed. But even GitLab, while certainly worth checking out in these uncertain times, might be more than you strictly need.
Let’s not dwell on what might become of GitHub. While GitHub is the most popular web-based interface for Git, it’s not the only one. For example GitLab, a fully open source competitor to GitHub, is reporting record numbers of new repositories being created after word of the Microsoft buyout was confirmed. But even GitLab, while certainly worth checking out in these uncertain times, might be more than you strictly need.
Let’s be realistic. Most of the software projects hackers work on don’t need even half the features that GitHub/GitLab offer. Whether you’ve simply got a private project you want to maintain revisions of, or you’re working with a small group collaboratively in a hackerspace setting, you don’t need anything that isn’t already provided by the core Git software.
Let’s take a look at how quickly and easily you can setup a private Git server for you and your colleagues without having to worry about Microsoft (or anyone else) having their fingers around your code.
A Word on Remotes
The first thing to understand is that Git doesn’t strictly use the traditional client-server kind of arrangement. There’s no Git server in the sense that we have SSH and HTTP servers, for example. In Git, you have what’s known as the remote, which is a location where code is copied to and retrieved from. Most of us are familiar with supplying a URL as the remote (pointing to GitHub or otherwise), but it could just as easily be another directory on the local system, or a directory on another machine that’s been shared over the network. It could even be the mount point of a USB flash drive, which you could then physically move to other machines to keep them all synchronized in a modernized version of the classic “Sneakernet”
So with that in mind, a basic “Git Server” could be as simple as mounting a directory on another machine with NFS and defining that as the remote in your local Git repo. While that would certainly work in a pinch, the commonly accepted approach is to use SSH as the protocol between your local machine and remote repository. This gives you all the advantages of SSH (compression, security, Internet routability, etc) while still being simple to configure and widely compatible with different operating systems.
Git over SSH
I’ll be doing this on a stock Raspbian install running on the Raspberry Pi 3, but the distribution of Linux you chose and even the device don’t really matter. You could just as easily do this on an old PC you have lying around in the junk pile, but the system requirements for this task are so light that it’s really an excellent application for the Pi.
The general idea here is that we are going to create a specific user for Git, and make it so they don’t have any shell access. We want an account that SSH can use, but we don’t want to give it the ability to actually do anything on the system; as anyone who uses the Git server will by necessity have access to this account. As it so happens, Git includes its own minimal shell to do just that called git-shell.
We’ll then prepare a place for our Git repositories to live, create a basic empty repository, and verify it’s working as expected from a client machine. Keep in mind this is going to be a very bare-bones setup, and I’m not suggesting you follow what I’m doing here exactly. This is simply to give you an idea of how quickly you can spool up a simple distributed control system for yourself or a small group using nothing but what’s included with the basic Git package.
Preparing the User Account
So let’s say you’ve already created the user “git” with a command like:
sudo adduser git
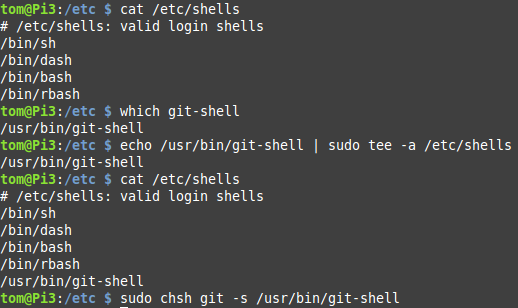 The next step is to see if
 git-shell is an enabled shell on your system, and if not (it probably isn’t), add it to the list of valid options.
That last line is the one that actually changes the default shell for the user. If you try to log in as “git” now, you’ll be presented with an error. So far, so good.
Except we already have a problem. Since the “git” user can no longer log into the system, we can’t use that account for any of the next steps. To make things easier on yourself, you should add your own account to the “git” group. As you’ll see shortly, that will make the server a bit easier to maintain.
The command to add a user to an existing “git” group will look something like this:
sudo usermod -a -G git USERNAME
A Place to Call Home
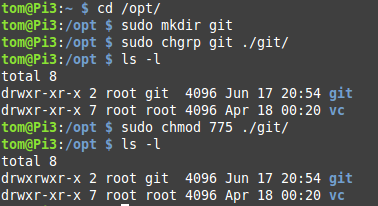 You might be inclined to just drop your repositories in the home directory of the “git” user. But for safety reasons it’s an account that can’t do anything, so it doesn’t make a whole lot of sense to put anything in its home directory.
To make things easier on yourself, you should create a directory in a globally accessible location like /opt, and then change its permissions so the group “git” has full access. That way, any account on the system that is in the “git” group will be able to add new repositories to the server.
If you want to skip this step, just keep in mind you’ll need to use sudo to add more repositories to the server. If this is a one-off box that’s not really a problem, but if you want to open this up to a few other people it’s helpful to have a more granular control over permissions.
At any rate, once you have the directory created where you want to store your repositories, it’s time to create a blank repository to use. This is as simple as creating a new directory and running a single Git command in it.
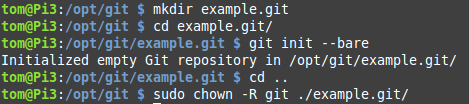
Pay special attention to that last line. You need to make sure the owner of the repository you just created is the “git” user, or else you’ll get permission errors when you try to push code up to the server from your clients.
The First Push
We now have a Git server that’s ready to have code pushed into it. From a client device, you would either create a new project to upload or else set this server up as a new remote for an existing Git repository. For the sake of clarity, here’s what it would look like to create a new local Git repository, add a file to it, and then push it to our new server.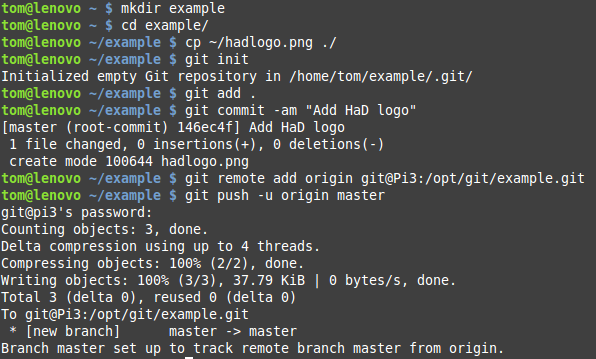
Notice in the git remote add command that the username and hostname are from our server system. If you don’t have DNS setup for name resolution on your network, you could simply use the IP address here. Of course that path should look familiar, as it’s where we created the example repository previously.
Assuming no errors, you’re now up and running. You can git clone this repository from another computer, pushing and pulling to your heart’s content. New repositories will need to be manually added before code can be pushed to them, but beyond that, the workflow is the same as what you’re used to.
A Simple Start
That’s all it takes to create your own Git server, and in fact, we actually did a fair bit more than was strictly required. If you’re on a secure network and the server is only for one person, you could really skip the new user creation and shell replacement. Just make the bare repository in your home directory and use your normal SSH credentials. Conversely, if you wanted to open this up to a group of trusted collaborators, the next logical step would be to setup SSH public key authentication and add their keys to the system.
But what if you want something a bit closer to the admittedly snazzy GitHub experience? Well, as it so happens there are a number of packages available that can provide a similar experience on a self-hosted server. There’s even a build of GitLab that you can run on a private box. Now that we’ve got the basics out of the way, we’ll be taking a look at some of these more advanced self-hosted Git options in the near future.
[ad_2]
Source link


