[ad_1]
Laser cutters are CNC power tools, which means an operator uploads a job digitally and then pushes START to let the machine do all the work while they lie back in a hammock sipping a margarita, occasionally leaping out in a panic because the sound coming from the machine changed slightly.
Like other power tools, laser cutters are built around doing one thing very well, but they require an operator’s full attention and support. The operator needs to handle all the other things that are go on before, during, and after the job. It’s not too hard to get adequate results, but to get truly professional and repeatable ones takes work and experience and an attention to detail.
People often focus on success stories, but learning from failures is much more educational. In the spirit of exploring that idea, here are my favorite ways to fail at laser cutting and engraving. Not all of these are my own personal experience, but they are all someone’s personal experience.
Ways to Fail Before the First Job
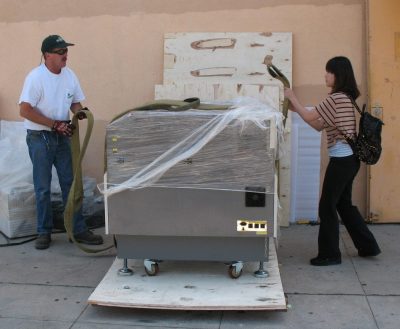
Failure to anticipate size, weight, and general awkwardness of moving and installing the equipment. Not all of us have warehouses, big open shop floors, or freight elevators to work with. Small desktop machines are fine, but larger units will be too heavy to move alone, and may not fit through doorways or around corners in a stairwell. (At least I didn’t have to find a way to hoist it to the third floor like our friends at Null Space Labs did.)
Failure to plan (and budget) for the extended needs of the laser cutter. A laser cutter requires not only power, but also exhaust and cooling. Exhaust might be either a fan and ducting, or a fume extractor / filter system. Generally speaking it’s good practice to keep any exhaust tubes as short as can be and with as few bends as possible. If the laser tube is water-cooled (which is likely) a cooling system that circulates distilled water through the laser tube needs to be nearby as well.
Failure to install in a place where noise and smell won’t be a problem. The exhaust fan, laser cutter, and cooling system aren’t as loud as table saws, but it’s still loud and a laser job can run for an extended time – especially when engraving. If there are people nearby, they might object to the noise. In addition, even with proper filtration and exhaust there will probably be at least some smells from laser cutting – which will range from burning wood to melting plastic depending on the material. Even slight smells wafting in might be unwelcome to others depending on the environment.
Failure to provide enough airflow. Hooking up an exhaust fan to suck air from the printer and vent it somewhere isn’t quite enough. That air needs to not only go somewhere, but it needs to come in from somewhere, too. An open window should do it, but not everywhere has windows.
If there is insufficient air intake, the exhaust system will cause negative pressure in the room. If there’s a drain anywhere, that negative pressure will pull gross smells up into the room through the drain.
Failures Before the Job is Started

Failure to engage (or have) a compressed air assist. Blowing compressed air at the area being laser cut helps prevent flare ups and keeps things clean by directing vaporized material downward and away from the cut, and away from the machine’s lenses and mirrors. Failing to engage (or failure to have) an air assist can lead to messier cuts and engravings than usual, and can increase the chance of flare-ups.
Failure to anticipate proprietary software and toolchain hassles. A cheap laser cutter from China will probably want to run its own proprietary software (although it is possible to upgrade to an open-source controller like RAMPS or go directly to a project like LaserWeb). On top of dealing with proprietary drivers and interfaces, every CAD software seems to have quirks about what will or won’t import or export without problems when it comes to drawings, even with supposedly standardized formats. It is annoying at best when you discover that there is a proprietary interface, that a favorite CAD program’s exports are not reliably compatible, or that you need to replace the controller on the machine that was just installed.
Failure by assuming power and speed settings for a material are correct. I have literally never pulled settings on the Internet (even for machines similar to mine) which give good results on the first try. Sometimes they are not even close. Treat them as a vague general direction in which to test, and don’t go straight to cutting or engraving production material without testing first.
Failures During the Job
![Unattended laser cutter fire [source: Arcbotics]](https://hackadaycom.files.wordpress.com/2016/05/burnt-laser-arcbotics-com.jpg?w=400&h=267)
Failure by leaving machine unattended. Called “fire” for short. The risk of fire is never zero, even on jobs and materials that have previously run without problems. These failures cannot really be predicted and occur with little or no warning.
I had a job somehow become corrupted in the laser cutter’s memory which led to a red-hot glowing gash where there should have been a thin cut. The air assist kept it from bursting into flame at first, but if I had not been around to hit the e-stop, it certainly would have ignited regardless of the air assist. Glad I didn’t need to use my fire extinguisher.
Hardware failures such as stepper motor malfunctions or belt breakage can result in fire risks as well. A laser cutter needs to be attended while in operation, no matter how boring the process has become.
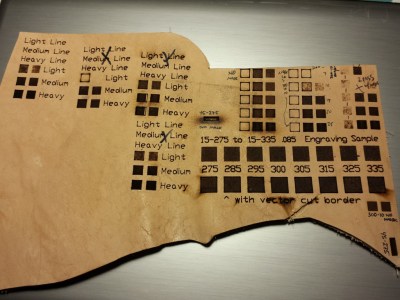
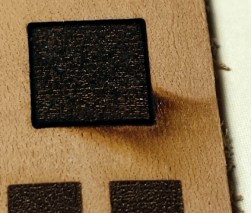
Failure to test on a sample. There is more to getting a good result than just correct power and speed settings. Even if the laser power and speed are technically correct for the material, only a test run will reveal any special handling needed to fully eliminate cosmetic blemishes like scorching or the piece moving during the job. On the right is a piece of leather filled with the process of finding how to get the best and most repeatable results.
Failure to have adequate cooling. A bucket of water and a submersible pump will get a laser cutter up and running, but isn’t appropriate for anything more than very light use. A chiller like the CW series (CW-3000, CW-5000) or equivalent circulates a water supply through the laser tube and cools it actively.
Finding out a bucket and a pump doesn’t cut it can wreck your budget if you haven’t anticipated the cost of an active cooler.
Failure to adjust focus before starting the job. The lens must be a fixed distance from the work surface for best results. It is possible to de-focus the laser intentionally for special purposes (such as thicker vector cut lines, or for Laser Origami) but forgetting to focus usually means the job is ruined.
Failure to zero the machine. There’s nothing worse than having everything set correctly, then realizing as soon as the job begins that the laser isn’t in the intended place on the material.
Failure to apply masking when needed. Apply a mask of tape to the material prevents scorching from marring the surface, and generally gives cuts and engraving a cleaner finish. Many plastics come with a protective film on one or both sides. Application Tape (sold at sign shops) is a good alternative for most materials.
It’s also possible to fail to apply masking properly. If the mask lifts or shifts, that can ruin the piece.
Failure to remove masking when not needed. When lightly engraving something, then it’s best to not apply masking, and remove any that exists. Light engraving through masking or protective film just gives a sort of melted plastic look. I have never found any setting or combination of settings that cleanly and completely removed the masking (and the adhesive) but only lightly engraved the material below it.
![Engraving the front of a mirror yields a double image [source: obrary.org]](https://hackadaycom.files.wordpress.com/2016/05/engraved-mirror-front.jpg?w=252&h=214)
Failure to account for a material’s unique properties. A material itself can have characteristics that will throw a curve ball even if everything else is right. For example, engraving a mirror. Nothing wrong with that, but engraving the front surface results in a double image (because the surface gets the engraving, which is reflected off the back.)
When cutting thin and light material, the featherweight pieces can flutter during cutting, or fly away entirely out the exhaust once cutting is done. One solution is to leave little ‘tabs’ to anchor the part to the rest of the material.
Failure to clean out debris. Normally the laser – after punching through material – hits the laser bed and doesn’t do much of anything. If it’s hitting bits and pieces left in the bed of the laser cutter instead, those are fire and scorching hazards.
Failure by cutting something bad. Some materials don’t belong in a laser cutter. Cutting PVC will release chlorine which will corrode pretty much anything it can reach inside the laser machine. Some types of glues and materials can emit foulness that will gum up mirrors and lenses when hit by a laser. I spoke with a fellow who once tried to laser cut some kind of magnetic sheet material. “I had to replace every mirror and lens,” he said. He didn’t like to talk about it.
Happily, at least when it comes to polymers, a few simple tests can reveal a lot about what a material is made of if you are unsure.
When Failures are Absent

If everything went well, you can get some very nice results! Here is a piece of leather I engraved for a client. Any one of the things listed above would have ruined the piece completely, so the test piece of scrap (pictured earlier) was critical. It was also important to do a test run to make sure the material didn’t behave in any unexpected way either during or after the engraving.
Failures Discovered After the Job
Failure to account for side effects. Some materials can have side effects. The job goes well, but closer inspection reveals something undesirable but inherent to the process or material used.

- Very thin plastics can deform from the heat of the laser. Narrow lines bend from the heat, and pieces can get a slight “bowl” shape as the corners lift up. Annealing the plastic by leaving it for a couple of hours in gentle heat just below the material’s softening point sometimes helps.
- Some types of plastic end up with tacky edges where the cut happened. A wipe with mineral spirits will clean that up.
- Laser-cut wood tends to smell like a campfire. The smell will dissipate over several days if left somewhere in the open (preferably in sunlight.) To speed the process up, I have had promising results from wrapping small freshly-cut pieces in a foil bundle and putting the bundle into gentle heat (100-120F) for a couple of hours.
- When engraving or cutting a white or light-colored plastic it’s easy to contaminate the freshly cut or engraved surface (which is full of micro-ridges) with… just about anything, like particles from other engraving, or even a dirty fingerprint. Scrubbing doesn’t help much, but I have had good results with ultrasonic cleaning for those times when it matters.
Failure to account for kerf (width of the laser cut). When cutting parts whose cut edges are intended to fit into or within other parts (for example, finger joints) this is a concern. Parts will probably be too tight or too loose.
Failure to account for hidden costs. Significant mainly for non-hobby use cases. Laser cutters do only one thing at a time, and must be attended fully while in operation. Even small jobs have a nontrivial cost because it’s not a fully automated tool – a job might take 1 minute in the laser cutter, but for the operator it can take a great deal longer from start to finish. Also, an unexpected error can ruin a production piece and require a do-over.
Using Failure to Improve
To avoid repeating mistakes, cultivate a sense of documentation and constant improvement. After all, failure is only waste if nothing was learned. If you are using a laser cutter professionally, any steps you can eliminate or streamline will have payoffs down the line in any repetitive task. Don’t get distracted trying to improve the laser cutter itself to make it do more, and faster. The machine may seem like the bottleneck but it should be everything else around it that qualifies first for improvement and streamlining, because between the tool and the operator, the operator is the more flexible one doing the most tasks. As with any other CNC tool, there is a lot more to the process than transferring a file and hitting START.
[ad_2]
Source link


